Installing aftermarket LED arrays often leads to a harsh reality on the shop floor. The factory mounts thrown in the box rarely match your specific tubing. Whether you are outfitting a rugged off-road rig, a nimble UTV, or a touring motorcycle, locking down the exact fitment dictates structural integrity and on-road safety. A precision fit stops loose components from shearing off, kills beam jitter dead, and shields expensive lighting investments from trail damage.
Recent market analysis highlights a definitive shift in the off-road and overland automotive sectors. Search data confirms that modern builders are actively ditching generic clamps in favor of precision-engineered solutions. The industry standard has moved toward mathematically verified fitments designed to handle extreme kinetic loads. Consequently, the demand for application-specific light mounting brackets has surged exponentially. Accessory engineers and fabrication professionals now require hardware that secures high-output LEDs without compromising structural integrity or vehicle aerodynamics.
Key Takeaways
- Measure Before You Buy: Accurately determining your vehicle's tube diameter using digital calipers is the only objective way to guarantee a secure fit for heavy lighting accessories.
- Small Tubes 0.75 to 1.25 Inches: Compact universal brackets are engineered specifically for tighter spaces like overland roof racks, ATVs, and motorcycle handlebars.
- Large Tubes 2 to 3 Inches: For heavy-duty applications such as truck bull bars and UTV roll cages, adjustable X-clamps provide the structural stability required for massive dual-row light bars.
- Motorcycle Specifics: Specialized clamps are mechanically designed to isolate high-frequency engine vibrations on crash bars and front forks without slipping.
- Rubber Inserts are Mandatory: High-quality brackets utilize EPDM rubber inserts to isolate vibrations, protect factory paint, and prevent galvanic corrosion between dissimilar metals.
Why Choosing the Exact Light Mounting Bracket Size Matters
Selecting the correct bracket size is not merely about visual aesthetics. It remains a fundamental requirement for mechanical stability, electrical reliability, and vehicular safety. When mounting aftermarket LED light bars or heavy pod lights, the bracket serves as the primary structural interface between the accessory and the vehicle frame.
Eliminating Vibration and Light Jitter
An improperly sized bracket fails to provide adequate clamping force around the mounting tube. Specifically, even a single millimeter of clearance creates severe structural resonance when navigating rough trails. This resonance translates directly into light jitter, which is a rapid and distracting oscillation of the light beam. From an operational standpoint, a vibrating light beam causes significant eye fatigue for the driver and severely reduces nighttime visibility. Furthermore, sustained high-frequency vibration physically damages the internal circuit boards and solder joints of the LED fixture itself. A precisely fitted bracket eliminates this micro-movement by maximizing the surface contact area.
Protecting Your Vehicle Finish
Vehicle roll cages, bull bars, and crash bars are typically finished with heavy powder coating, anodizing, or chrome plating to prevent oxidation. When a bracket fits too loosely, the dynamic forces of driving cause the metal clamp to shift and rotate against the mounting bar. Consequently, this metal-on-metal friction rapidly degrades the protective finish, exposing the underlying bare steel or aluminum to moisture and road salt. Over time, this leads to localized rust and structural degradation. Securing the exact size ensures a static and immovable grip that preserves the pristine integrity of your exterior finish.
Ensuring Off-Road Safety and Durability
The physics of off-road driving multiply the effective weight of mounted accessories drastically. For instance, a standard 5-pound LED pod light exerts hundreds of pounds of dynamic shear force on its mounting point when a vehicle hits a deep pothole. If the bracket is incorrectly sized, these dynamic loads easily overcome the friction of the clamp. The assembly may rotate downward, rendering the light useless, or completely detach from the vehicle at highway speeds, creating a severe hazard.
How to Measure Your Tube or Pipe for a Light Mounting Bracket
Before consulting any sizing chart, obtaining the exact Outside Diameter of your mounting tube is a mandatory prerequisite. Do not rely on manufacturer nominal pipe size specifications, as these often refer to the inside diameter of plumbing pipes rather than the structural exterior dimensions utilized in automotive fabrication.
The Caliper Method
The absolute most precise method for determining tube size is using a digital vernier caliper. First, ensure the mounting bar is clean and free of thick mud or debris. Open the jaws of the digital caliper and place them directly across the widest point of the tube cross-section. Close the jaws until they sit flush against the metal. Take the reading in inches or millimeters. To account for potential tube ovality, which is especially common on mandrel-bent sections of a bull bar, take a second measurement 90 degrees from the first. Ultimately, use the larger of the two measurements to dictate your bracket size.
The String and Tape Measure Method
If a digital caliper is unavailable, the string method provides a mathematically sound alternative based on the relationship between circumference and diameter. Take a non-stretchable piece of string and wrap it tightly around the exact location where you intend to install the bracket. Mark the exact point where the string overlaps. Next, lay the string flat on a table and measure the distance from the end to your mark using a standard rigid tape measure to find your circumference. Finally, divide the circumference by Pi, or 3.14159. For example, if your circumference is 4.71 inches, dividing by 3.14159 yields exactly 1.5 inches for your Outside Diameter.
Common Standard Tube Sizes in Automotive Fabrication
While manual measuring is strictly required, automotive manufacturers generally adhere to industry-standard tubing sizes based on the application load. Standard dimensions for motorcycle handlebars and scooter accessory rails typically measure 7/8 inch or 1.0 inch. Moving up the scale, 1.25-inch tubing is frequently utilized for motorcycle engine crash bars and lightweight ATV cargo racks. In contrast, 1.5 to 1.75 inches is the standard structural tubing size for Jeep Wrangler factory roll bars, UTV roll cages, and golf cart roof supports. Finally, sizes ranging from 2.0 to 3.0 inches are strictly reserved for heavy-duty applications, including full-size truck bull bars, grille guards, and heavy agricultural equipment.
The Complete Universal Mounting Bracket Sizing Chart
To facilitate accurate purchasing decisions, refer to the comprehensive sizing chart below. This table cross-references exact tube diameters with the appropriate bracket architecture and common vehicle applications, ensuring you select the optimal hardware for your specific kinetic load requirements.
| Tube Diameter - Inches | Tube Diameter - mm | Recommended Bracket Type | Common Vehicle Applications | Typical Load Capacity |
| 0.75 to 1.25 | 19mm to 32mm | Small Tube Clamp with Inserts | Motorcycle handlebars, ATV racks, roof rack crossbars | Light - Pods and Ditch Lights |
| 1.50 to 1.75 | 38mm to 45mm | Standard Roll Bar Clamp | UTV roll cages, Jeep roll bars, golf cart frames | Medium - Single-row bars |
| 2.00 to 2.50 | 51mm to 64mm | Adjustable X-Clamp | Mid-size truck bull bars, heavy UTV bumpers | Heavy - Dual-row bars |
| 2.50 to 3.00 | 64mm to 76mm | Large X-Clamp Heavy Duty | Full-size truck grille guards, tractor ROPS, marine towers | Very Heavy - 50 inch plus bars |
Specs and Uses for the 0.75 to 1.25 Inch Tube Mounting Bracket
Precision is paramount when outfitting vehicles with smaller diameter tubing. Using oversized clamps packed with excessive shims severely compromises structural integrity. Instead, selecting a purpose-built bracket ensures optimal load distribution and prevents catastrophic equipment failure on the trail.
Ideal Applications for Small Tubing
Tubing measuring between 0.75 inches and 1.25 inches is standard across several specific utility categories. Roof racks on overland SUVs often utilize 1-inch crossbars to minimize wind resistance. Similarly, ATV cargo racks and motorcycle handlebars typically fall within this exact dimensional range. Because these areas present tight spatial constraints, a compact universal 0.75–1.25 inch tube mounting bracket is required to avoid interfering with cargo loading or steering mechanisms. Its low-profile geometry ensures it does not snag on branches during tight trail riding.
Core Engineering Specifications
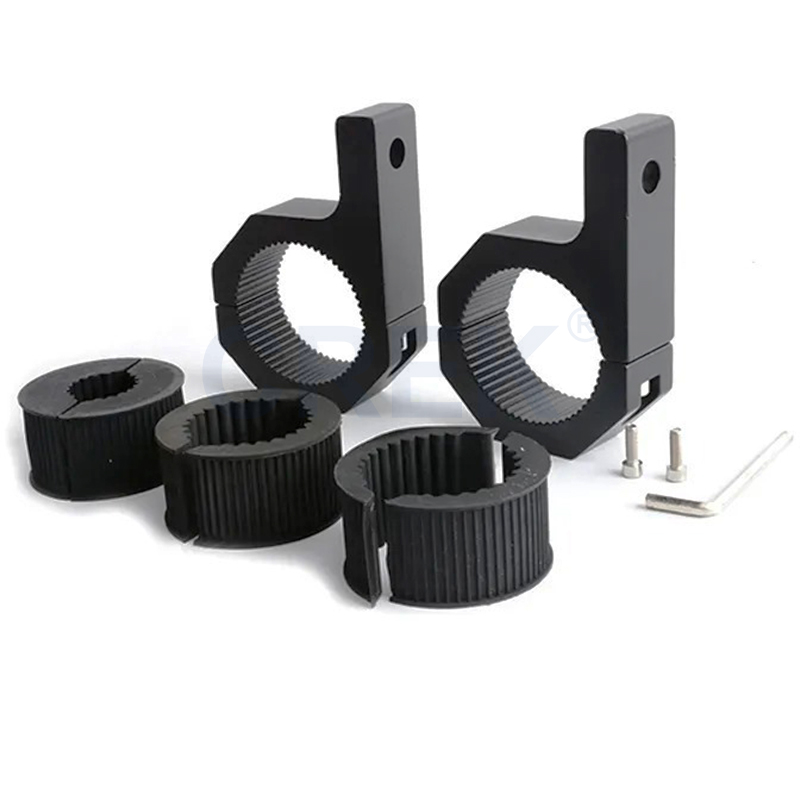
High-quality brackets in this size category are manufactured from die-cast aluminum alloy. This specific material provides an exceptional strength-to-weight ratio, ensuring the bracket does not add unnecessary top-heavy mass to a roof rack while remaining naturally resistant to oxidation. A defining characteristic of these kits is the inclusion of modular EPDM rubber sizing inserts. Rather than relying on a single fixed diameter, these units provide pre-molded inserts for 19mm, 25mm, and 32mm tubes. This modularity allows the installer to adapt the clamp precisely without relying on substandard DIY shimming methods.
Specs and Uses for the Adjustable 2 to 3 Inch X-Clamp
Heavy-duty applications present a completely different set of mechanical challenges. Bull bars and heavy grille guards are often manufactured with slight tapers, non-perfect ovality from mandrel bending, and thick layers of protective coating. Standard two-piece circular clamps struggle to maintain a uniform grip on these irregular surfaces.
The Dynamic X-Clamp Advantage
The fundamental advantage of an adjustable 2–3 inch x-clamp mounting bracket lies in its unique geometric design. Instead of relying on a static semi-circle, the X-clamp utilizes a pivoting multi-axis hinge system. As the securing tension bolts are tightened, the opposing arms draw inward, dynamically conforming to the exact outside contour of the tube. This pivoting mechanism effectively distributes the clamping force across four distinct contact points rather than just two. Consequently, it significantly reduces the risk of slippage under heavy loads and easily grips bars that are slightly oval or tapered.
Core Specifications for Heavy Loads
Given the demanding kinetic environments these vehicles operate in, the construction specifications for an X-clamp must be exceptionally robust. They are forged from high-grade aluminum and utilize heavy-gauge 304 stainless steel hardware to withstand extreme blunt-force impacts from brush and debris. Because of the massive clamping force generated by the four-point dynamic pivot hinge, these brackets boast an exceptionally high load capacity. They are structurally certified to support the heaviest lighting equipment on the market, including massive 50-inch dual-row LED light bars.
Specs and Uses for the Motorcycle Round Pipe Clamp Bracket
Motorcycles operate in a completely different dynamic environment compared to enclosed four-wheeled vehicles. The structural requirements for mounting lights on a motorcycle must account for aggressive lean angles, extreme aerodynamic drag, and most importantly, intense high-frequency engine vibrations traveling directly through the frame.
Designed Specifically for Two-Wheelers
The spatial constraints on a motorcycle are severe. A bulky bracket easily interferes with aerodynamic fairings, limits the turning radius of the front forks, or poses a safety hazard to the rider. Standard automotive brackets quickly vibrate loose under the intense harmonic vibrations generated by large displacement engines. To combat this, a dedicated universal motorcycle round pipe clamp bracket is specifically engineered to isolate the light housing and counteract these specific frequencies.
Core Specifications and Vibration Dampening
Built to accommodate 1-inch to 2-inch front forks and crash bars, these mounts feature highly refined engineering traits. The aluminum housing is machined with a slim-profile design to remain unobtrusive. Moreover, premium versions incorporate aggressive internal anti-slip teeth machined directly into the aluminum jaw. When compressed against high-density rubber dampeners, these teeth bite into the rubber to create a mechanical lock. This ensures the light beam remains perfectly leveled regardless of aggressive engine RPMs or harsh road conditions.
Material and Hardware Specs for High-Quality Brackets
Evaluating a light mounting bracket based solely on its physical dimensions is only half of the equation. The metallurgical composition and hardware quality ultimately dictate the lifespan, reliability, and aesthetic preservation of the product in harsh outdoor environments.
Aluminum Versus Steel Construction
The vast majority of premium brackets are CNC machined or die-cast from high-grade aluminum alloy. Aluminum offers a distinct advantage because it is inherently lightweight and forms a natural oxide layer that prevents deep structural rusting. For most automotive and off-road applications, aluminum is the superior choice. On the other hand, carbon steel brackets offer higher ultimate tensile strength but are extremely susceptible to rust if their powder-coated finish is chipped by flying road debris.
The Importance of Stainless Steel Hardware
A bracket is only as strong as its weakest bolt. Inferior brackets often utilize cheap zinc-plated steel bolts, which rapidly corrode and seize when exposed to moisture, road salt, and mud. Once a bolt rusts inside the aluminum threads, it becomes impossible to adjust or remove the light without drilling out the hardware. High-quality brackets strictly utilize 304 marine-grade stainless steel for all Allen screws, hex bolts, and locking nuts. This mitigates bimetallic galvanic corrosion and ensures the hardware remains structurally sound.
Step-by-Step Installation Tips for Your Light Mounting Bracket
Proper installation is just as critical as selecting the correct hardware. Following a systematic mounting procedure guarantees that the empirical load ratings of the bracket are achieved, preventing accidental damage to the bracket or the vehicle tubing.
Pre-Installation Surface Prep
Begin by thoroughly cleaning the mounting surface on the vehicle tube using a mild degreaser or isopropyl alcohol. Any residual wax, mud, or oil acts as a lubricant, severely reducing the friction coefficient of the rubber insert. Next, test-fit the rubber inserts around the bar without the bracket to ensure the ends meet flush without overlapping. If the rubber overlaps, it creates a pinch point that prevents the aluminum bracket from closing evenly.
Mounting, Aligning, and Torquing
Assemble the bracket around the tube and insert the stainless steel hardware. At this stage, only finger-tighten the bolts. The bracket should be snug enough to hold its vertical position but loose enough to be rotated by hand. Attach your LED light bar to the bracket and use a magnetic torpedo level to ensure the beam projects parallel to the ground.
Over-tightening is the most common cause of bracket failure. Applying excessive torque strips the aluminum threads or snaps the stainless steel bolts. Always use a calibrated torque wrench. For vehicles subjected to heavy off-road use, apply a single drop of medium-strength blue threadlocker to the bolt threads prior to final torquing. This prevents vibrational loosening over time while still allowing for future removal with standard hand tools.
Conclusion
Matching your tube size to the correct bracket ensures unparalleled stability and peace of mind on the trail. By taking the time to measure accurately with digital calipers, you prevent catastrophic hardware failure during intense off-road driving or daily highway commutes. Always verify your bar measurements against a reliable sizing chart, as accurate data prevents improper fitment and costly equipment damage. To secure your setup properly with mathematically verified hardware, we highly recommend exploring the professional-grade inventory at CREK Lights. Take action today, measure your tubing accurately, and select the exact application-specific bracket to elevate your vehicle lighting performance.
FAQ
Can I use a round light mounting bracket on a square tube?
While some round brackets can be forced onto square tubes, it is highly discouraged by fabrication engineers as it provides minimal surface contact. You should purchase brackets specifically designed with 90-degree internal angles for square tubing to ensure structural stability and prevent damage to the mounting surface.
Do I really need to use the rubber inserts that come with the bracket?
Yes. The rubber inserts not only protect your vehicle paint but also act as a crucial vibration dampener. They provide the necessary friction coefficient to keep the heavy light assembly from rotating downward on bumpy roads. Metal-on-metal clamping inevitably slips over time due to a severe lack of friction.
What is the best material for off-road light mounting brackets?
Die-cast or CNC-machined aluminum alloy is widely considered the best material for bolt-on brackets. It provides an excellent strength-to-weight ratio and naturally resists rust in harsh weather conditions. It must be paired with 304 stainless steel hardware to prevent galvanic corrosion and ensure long-term adjustability.
How much weight can a standard roll bar clamp hold?
Load capacity depends heavily on the bracket geometry and tube diameter. A standard 1.5-inch aluminum roll bar clamp can comfortably support medium-weight fixtures like single-row light bars or heavy pod lights. However, for massive 50-inch dual-row light bars that generate extreme dynamic leverage, upgrading to a 4-point adjustable X-clamp is structurally required.
How do I know if I need a small tube bracket or a larger size?
You must measure the outside diameter of your mounting bar using calipers. If the diameter is 1.25 inches or smaller, which is common on roof racks and dirt bikes, a compact small-tube bracket is appropriate. If the outside diameter is 1.5 inches or larger, you will need to step up to a standard roll bar clamp or a heavy-duty adjustable X-clamp.


