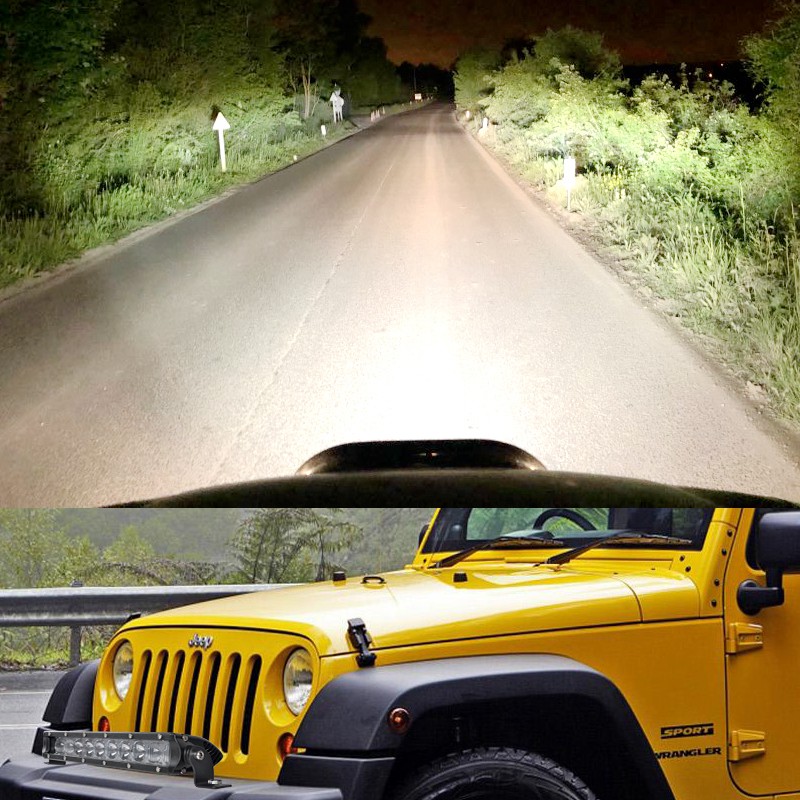
Many drivers wire up high-lumen lighting setups only to face a frustrating reality on the trail. They flip the switch, and the beam pattern creates blinding hood glare or completely fails to illuminate the path ahead. Buyers frequently over-index on raw lumen counts while ignoring beam geometry, optic quality, and physical bar shape. This oversight leads to mismatched equipment. The light output simply does not align with the vehicle's speed, terrain, or mounting location. The result is poor visibility and wasted budget.
Selecting the correct beam pattern requires a technical evaluation of beam angles, lux ratings, and intended use cases. We will break down the framework for comparing spot, flood, and combo patterns. This allows you to make an evidence-backed purchasing decision that properly supplements factory headlights.
Raw lumens do not equal usable light: Evaluation must focus on lux and candela, which measure how effectively a beam pattern pushes light downrange or across a wide area.
Mounting location and bar shape impact performance: Roof-mounted flood beams often cause severe hood glare, while curved light bars naturally enhance peripheral spread.
Combo beams offer practical versatility: A combo beam LED light bar provides the most balanced solution for general off-road use, typically utilizing a 2/3 spot and 1/3 flood configuration, making it the preferred choice for most buyers.
Defining Success: The Physics of LED Light Bar Performance
Auxiliary lighting must solve specific visibility problems. Relying solely on manufacturer lumen claims is a flawed evaluation metric. Lumens only tell part of the story. Auxiliary lights should function as a strategic extension of OEM high and low beams. You need light directed precisely where your tires will travel and where your eyes need to focus.
To evaluate performance accurately, you must differentiate between three critical lighting metrics. Understanding these terms prevents you from buying a bright light that performs poorly in real-world off-road conditions. A light that scatters energy into the tree canopy does nothing for your reaction time on the trail.
Metric
Technical Definition
Practical Off-Road Application
Lumens
The total amount of visible light emitted at the source diode.
Indicates raw electrical power conversion, but fails to measure how far or wide the light actually travels down the trail.
Lux
The intensity of light illuminating a specific surface area at a specific distance.
Determines how brightly a washout or boulder appears 100 yards ahead of your bumper.
Candela
The directional intensity of the light beam focused by the optic.
Measures the focused punch of the beam pattern, critical for high-speed driving visibility.
Reflector and optic geometry shape the light output. There is a strict inverse relationship between beam width and beam distance. You cannot have maximum width and maximum distance simultaneously from a single optic. A wider beam sacrifices forward throw. A narrow beam sacrifices peripheral illumination. The physics of light dispersion demand a compromise based on your specific driving environment.
Budget light bars often suffer from severe light scatter. They use poor parabolic reflector designs. This wastes light energy by spilling it into the sky or directly onto your vehicle's hood, creating a wall of white light that destroys natural night vision. Premium brands utilize advanced TIR (Total Internal Reflection) optics. TIR technology strictly controls beam angles. It captures almost all emitted light from the diode and directs it precisely where intended. This maximizes usable lux and eliminates wasted glare.
The Spot Beam LED Light Bar: Long-Distance Visibility
High speeds demand rapid reaction times. A spot beam LED light bar excels in these scenarios. These units typically feature a tight beam angle ranging from 10 to 30 degrees. Manufacturers achieve this using deep cone reflectors or specialized magnifying optics. The design focuses the light intensely forward. It punches through the darkness to reveal obstacles far downrange.
Spot patterns serve specific driving environments perfectly. They are ideal for high-speed off-roading, desert racing, and navigating long, straight rural roads where legally permitted. When driving over 50 miles per hour off-road, you outrun your factory headlights quickly. You need to see a washed-out bridge, a deep rut, or a large animal hundreds of yards away. Spot beams provide the necessary distance to brake or maneuver safely before impact.
However, spot beams come with distinct limitations. The primary trade-off is the tunnel vision effect. Because the beam is so narrow, it provides minimal peripheral illumination. You can see far ahead, but the immediate sides of the trail remain completely dark. This makes spot beams poor choices for tight, winding trails. If you navigate dense forests or sharp switchbacks, a pure spot pattern will leave you blind through the corners. You will constantly turn your steering wheel into unlit territory.
Proper aiming is critical for spot patterns. A misalignment of just a few degrees will send your focused beam into the dirt directly in front of your truck or up into the trees. You must park on level ground and aim the hot spot of the beam exactly parallel to the ground to maximize its effective range.
The Flood Beam LED Light Bar: Maximum Peripheral Illumination
Technical driving requires a massive field of view. A flood beam LED light bar delivers exactly this. These bars utilize a wide beam angle, usually spanning 40 to 120 degrees. They achieve this spread using shallow reflectors or heavily diffused lenses. The optics scatter the light evenly over a broad area. They prioritize width over forward distance, flooding the immediate foreground with usable light.
Flood patterns dominate low-speed off-road applications. They are essential for rock crawling. When navigating dense wooded trails, you need to see tree branches encroaching on your doors and sharp rocks threatening your sidewalls. Agricultural work, recovery operations, and stationary job sites also benefit immensely from flood lighting. Flood lights illuminate a wider area at a shorter distance than typical factory headlights. They allow you to see exactly where your front tires will land and what obstacles sit just off the shoulder.
The main limitation of a flood beam is the lack of forward punch. The light dissipates quickly over distance. You cannot use a flood pattern for high-speed driving because you will outrun the light throw. Furthermore, flood beams create a massive wall of light. This characteristic causes severe glare in dusty, foggy, or snowy conditions. The wide-angle light reflects off airborne particles directly back into your eyes, blinding you.
Terrain Type
Recommended Beam Pattern
Reasoning
High-Speed Desert / Baja
Spot Beam
Requires maximum forward throw to identify hazards before outrunning the light.
Technical Rock Crawling
Flood Beam
Requires wide peripheral vision to spot tire placement and avoid sidewall damage.
Dense Forest Trails
Flood or Combo Beam
Requires illumination of low-hanging branches and tight switchback corners.
Overland Mixed Terrain
Combo Beam
Requires a balance of forward distance for transit and width for camp setup.
The Combo Beam LED Light Bar: The Versatile Middle Ground
Most drivers encounter varied terrain on a single trip. They need both distance and width. A combo beam LED light bar provides the architecture to handle mixed environments. The standard industry configuration places spot optics in the center. These make up roughly 66 percent of the bar. Flood optics flank the spot section on the outer edges. This design blends the strengths of both patterns into one cohesive unit.
This configuration represents the optimal choice for overlanding. General off-road enthusiasts heavily favor combo beams. Many drivers only have the physical space or budget for a single light bar on their front bumper or roof rack. A combo pattern ensures you do not compromise entirely on either speed or technical visibility. It pushes a hot spot down the center of the trail while simultaneously casting a wide wash of light into the ditches.
When evaluating combo bars, look closely at how manufacturers blend the transition zones. Basic models use distinct, segmented reflectors. You will notice a harsh, distracting line between the spot center and the flood edges. Premium models utilize advanced optics to create a seamless, rectangular beam pattern. For example, a 20x8-degree driving combo pushes light downrange while smoothly illuminating the immediate shoulder. This seamless transition reduces eye fatigue during long night drives, as your eyes do not have to constantly adjust to harsh bright and dark spots.
Wiring a combo bar is typically straightforward. Most units operate on a single circuit, meaning the spot and flood sections activate together. However, some high-end models feature dual-circuit wiring. This allows you to wire the spot and flood sections to separate switches in your cab, giving you ultimate control over your lighting environment based on immediate trail conditions.
Specialty Patterns: Hyper-Spot, Driving, and Fog Beams
Standard spot and flood patterns cover most needs. However, specific driving conditions require specialized optic geometry. Understanding these specialty patterns helps you fine-tune your lighting setup for extreme environments or legal compliance.
Hyper-Spot Beams
Hyper-spot beams utilize ultra-narrow patterns, typically under 5 degrees. They serve extreme long-range applications. Trophy trucks and rally cars use them to see miles down a straight desert track. You must pair hyper-spot beams with wider lights. Running them alone causes severe visual fatigue. Your eyes struggle to process the intense, tiny dot of light bouncing rapidly against the dark horizon as your vehicle's suspension cycles over bumps.
Driving Beams (SAE Compliant)
Driving beams bridge the gap between on-road safety and off-road capability. They act as street-legal auxiliary lights. These optics feature a sharp horizontal cutoff. This cutoff prevents the light from blinding oncoming traffic on public roads. If you need supplementary lighting for highway driving, you must select an SAE-compliant driving pattern. Standard off-road bars lack this cutoff and remain strictly illegal for street use.
Fog and Amber Beams
Color temperature plays a massive role in visibility. Stark white light, usually 6000K or higher, reflects heavily off airborne particulate matter. Amber or yellow light, sitting around 3000K, cuts through these particles much more effectively. Amber fog beams reduce the glare caused by dust, snow, and heavy rain. They improve contrast and depth perception in terrible weather conditions. Mounting amber fog beams low on the bumper ensures the light cuts under the weather rather than illuminating the storm directly in front of your windshield.
Form Factor and Strategic Mounting: Matching Beam to Vehicle
Buying the right beam pattern solves only half the problem. You must mount the LED light bar correctly. The physical shape of the bar and its location on the vehicle drastically alter beam dispersion and usable light. Poor mounting placement will render even the most expensive optics useless.
Physical Shape (Curved vs. Straight)
The physical design of the chassis matters. Curved bars naturally widen the flood footprint. The arc of the housing angles the outer optics outward. This enhances peripheral vision significantly. Curved bars match the natural contour of modern windshields and bumpers, providing a sleek aesthetic. Straight bars excel at focused, forward projection. They keep all optics aligned on a single horizontal plane, maximizing distance and punch.
Size and Profile (Single vs. Dual Row)
Dual-row bars stack two rows of LEDs. They offer higher raw output in the exact same width. They work well on large trucks, heavy equipment, and full-size roof racks. Single-row bars provide a tighter vertical cutoff. They fit easily into lower-profile mounting spaces, like behind a grille, inside a bumper cutout, or on a sleek roof rack. Single-row bars often produce less hood glare because the light source is narrower and easier to shield.
Roof Mounts (Windshield/Cab)
Roof mounting provides excellent elevation for pushing light far down the trail. However, this location is strictly for spot or tight combo patterns. You face a massive implementation risk if you mount flood patterns above the windshield. The wide-angle light will illuminate your hood, causing blinding glare. This glare destroys your night vision. Always prioritize tight beam angles for roof applications and consider applying matte black vinyl to your hood to absorb stray light.
Bumper and Grille Mounts
The front bumper represents the most versatile mounting height. It keeps the light below the driver's eye line. This location is ideal for flood beams, driving patterns, and combo bars. Bumper mounts cut under dust and fog rather than illuminating it from above. They provide excellent foreground lighting for technical trails and are much easier to wire than roof-mounted setups.
Ditch Lights (A-Pillar Mounts)
Ditch lights utilize small LED pods mounted near the A-pillars or hood hinges. They use flood or wide-cornering patterns. You angle them outward, away from the hood. They illuminate the vehicle's immediate periphery. Ditch lights perfectly supplement a roof-mounted spot bar. They fill in the dark corners on winding trails without causing forward glare, allowing you to see exactly where you are turning.
Implementation Risks & Mitigation
Installing high-output auxiliary lighting introduces several mechanical and legal risks. You must plan your electrical system meticulously and understand local regulations before modifying your vehicle. Poor wiring leads to blown fuses, melted harnesses, and catastrophic vehicle fires.
Legal and Compliance Factors
Local laws heavily restrict auxiliary lighting on public roads. Most standard off-road light bars are strictly for off-highway use. Igniting a 50-inch combo bar on the highway will blind oncoming drivers and result in heavy fines. Unless the light is specifically stamped with SAE/DOT compliance, you must keep it covered or switched off on pavement. Always check your state or provincial regulations regarding uncovered off-road lights. Many jurisdictions require opaque covers on all auxiliary lights while driving on public roads.
Electrical Draw and Scalability
High-output light bars consume significant amperage. You must calculate whether your vehicle's factory alternator and battery can handle the additional load. Use the formula: Amps = Watts / Volts. A 240-watt bar on a 12-volt system draws 20 amps. You must use proper relays, appropriately sized fuses, and thick wire gauges. Undersized wiring creates severe fire hazards due to excessive heat buildup.
Amperage Draw
Recommended Wire Gauge (AWG) for 10ft Run
Recommended Relay Size
0 - 10 Amps
16 AWG
30 Amp Relay
10 - 20 Amps
14 AWG
30 Amp Relay
20 - 30 Amps
12 AWG
40 Amp Relay
30 - 40 Amps
10 AWG
50 Amp Relay
Weather and Environmental Mitigation
Off-road environments destroy cheap electronics. You must select housings rated IP68 or IP69K. These ratings guarantee protection against fine dust ingress and high-pressure water spray from river crossings or pressure washers. Moisture inside the lens ruins optic performance and shorts circuit boards. Additionally, consider utilizing amber lens covers. Snap-on covers allow you to adapt a white light bar for sudden dust storms or blizzards without buying a dedicated amber unit. Ensure your mounting hardware utilizes stainless steel to prevent rust and corrosion after winter driving.
Conclusion
Measure your available mounting space on the bumper, grille, or roof rack to determine the maximum bar length your vehicle can accommodate.
Calculate your vehicle's available electrical capacity using the watts-to-amps formula to ensure the alternator can support the required draw.
Select TIR optics over raw lumen counts to minimize wasted light scatter and maximize usable lux on the trail.
Identify your primary driving environment and typical speeds to select the exact beam pattern required for your specific terrain.
Install the appropriate wiring harness, relays, and optional amber covers to complete a safe, weather-resistant lighting setup.
FAQ
Q: What is the difference between a spot and flood LED light bar?
A: A spot beam features a narrow angle designed to throw light long distances for high-speed driving. A flood beam uses a wide angle to scatter light across a broad area, ideal for low-speed technical trails and peripheral visibility.
Q: Is a combo beam LED light bar better than separate spot and flood lights?
A: A combo beam provides excellent single-unit convenience and saves mounting space. However, separate spot and flood lights offer superior modular control. Dedicated lights allow you to angle flood pods independently while keeping spot beams aimed perfectly straight.
Q: How does a curved LED light bar affect the beam pattern?
A: The curved chassis physically angles the outer LEDs outward. This naturally increases the peripheral spread of the flood optics on the edges. It provides a wider field of view compared to a straight bar of the exact same optic configuration.
Q: Can I use an off-road LED light bar on the highway?
A: No, standard off-road light bars are illegal to use on public highways. They lack the sharp horizontal cutoff required to prevent blinding oncoming traffic. You may only use auxiliary lights on the street if they are specifically SAE/DOT compliant.
Q: How do you prevent hood glare from a roof-mounted LED light bar?
A: Mount the bar as far back on the roofline as possible. Strictly use spot or tight combo patterns, avoiding flood optics entirely on the roof. You can also install glare shields under the bar or apply matte black vinyl to your hood.
Shenzhen Creek Optoelectronic Technologies Co., Ltd. produce Car LED work lights, off-road LED light bar, forklift safety lights, agricultural tractor work lights, LED strobe and beacon lights, car radios, etc.