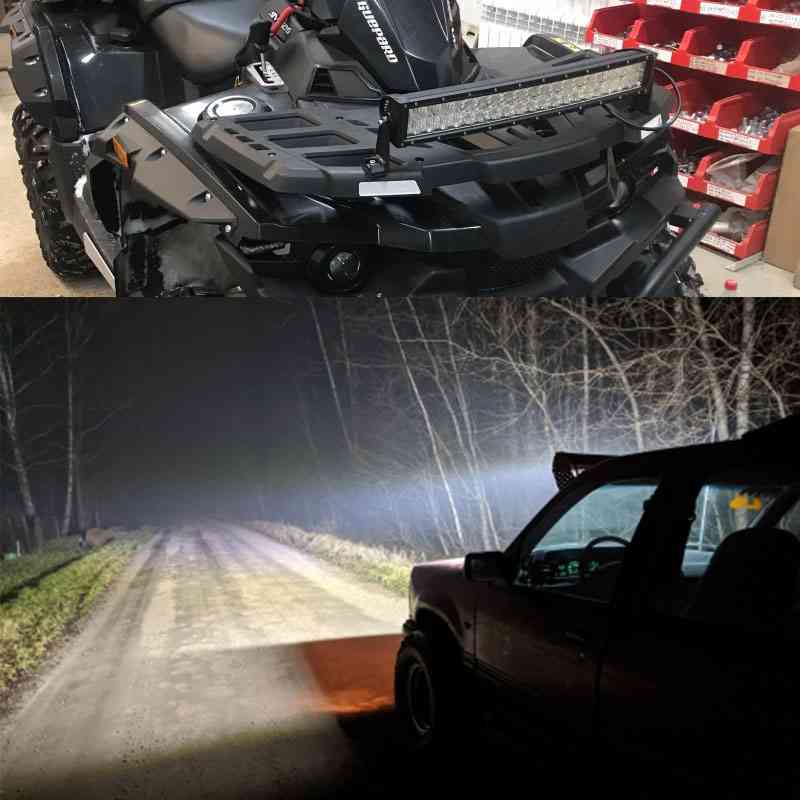
Upgrading off-road lighting requires more than just maximizing lumen output. Selecting the wrong physical profile results in wasted usable light, excessive wind noise, and awkward mounting geometry. Buyers must navigate the inherent trade-offs between wide-angle peripheral visibility and maximum forward-punch distance. You must also account for vehicle aerodynamics, structural fitment, and electrical constraints.
This guide breaks down the optical physics, mounting realities, terrain-specific use cases, and build-quality considerations. We will help you evaluate whether a curved Led light bar or a straight alternative is the correct technical choice for your vehicle. By understanding how beam patterns interact with different driving environments, you can optimize your lighting setup for maximum safety and performance.
Optical Spread vs. Distance: Curved bars distribute light across a wider horizontal plane (ideal for winding trails), whereas straight bars concentrate reflectors for maximum forward distance (ideal for high-speed open terrain).
Vehicle Integration: A curved LED light bar naturally contours to modern windshields and curved front bumpers, reducing aerodynamic drag and aesthetic mismatch compared to straight bars.
Row Configuration Matters: The choice between a single row curved LED light bar (low profile, less wind noise) and a curved dual row LED light bar (maximum output, larger footprint) dictates both electrical draw and bracket requirements.
Mounting & Structural Constraints: Straight bars are structurally easier to mount on flat surfaces like traditional roof racks, whereas curved bars often require specialized, vehicle-specific brackets to prevent tension on the housing and subsequent moisture ingress.
Cost & Manufacturing Premium: Curved light bars typically carry a higher price tag due to the complexity of manufacturing extruded curved aluminum housings and custom-arced polycarbonate lenses.
Understanding Beam Geometry: Curved vs. Straight
The Physics of a Curved LED Light Bar
The physical arc of a curved housing fundamentally alters the focal point of the outer reflectors. Instead of firing light strictly parallel to the vehicle's centerline, the diodes on the far left and right edges angle outward. This geometric shift creates a wider horizontal spread. You typically gain a 10 to 20-degree wider field of view compared to straight equivalents. This broad wash of light effectively illuminates ditches, tree lines, and peripheral hazards that would otherwise remain hidden in the dark.
This optical advantage comes with a specific trade-off. Because the outer reflectors direct light away from the center, the central hotspot loses some of its concentrated intensity. The total lumen output remains the same, but the lux—the measurement of light intensity at a specific distance—decreases dead ahead. You get superior side-to-side visibility, resulting in slightly less maximum forward throw. When driving through areas with heavy wildlife populations, this lateral illumination gives you critical extra seconds to react to animals approaching the trail.
The Mechanics of a Straight LED Light Bar
A linear housing aligns all internal reflectors parallel to the vehicle's forward trajectory. Every diode works in unison to push light straight down the trail. This configuration creates overlapping light cones that form a highly concentrated, long-distance forward punch. When you need to see obstacles hundreds of yards away, this parallel alignment delivers maximum lux exactly where you are steering.
The primary limitation of a straight LED light bar is its narrow peripheral vision. The concentrated beam pattern leaves the immediate sides of the vehicle in shadow. Drivers navigating tight switchbacks or dense forests often find themselves turning into pitch-black corners. To compensate for this tunnel-vision effect, you usually need to install supplementary ditch lights or wide-cornering pods on the A-pillars. Without these additions, you risk driving blindly into sharp turns.
Impact on Spot, Flood, and Combo Lenses
Most modern light bars utilize a combo beam pattern, featuring spot reflectors in the center and flood reflectors on the outer edges. The shape of the housing drastically changes how this combo pattern performs in the real world.
Curved Combo Performance: A curved combo bar maximizes the flood effect on the periphery. The angled outer edges push the flood beams even further wide, creating a massive panoramic field of view. The center spot beams still provide adequate distance, but the transition from spot to flood is exceptionally smooth.
Straight Combo Performance: A straight combo bar relies heavily on the raw power of the center spot diodes. The outer flood reflectors still provide some spill, but they fire straight ahead rather than outward. This keeps the light tightly grouped.
Dedicated Spot Lenses: If you order a straight bar with 100% spot lenses, you create a laser-like beam designed purely for extreme distance. Doing this with a curved bar defeats the purpose of the curved housing, as the outer spot beams will simply point into the trees.
Evaluation Dimensions: Matching Light Profile to Terrain
When navigating dense forests or winding mountain trails, vehicle speeds rarely exceed 20 miles per hour. In these low-to-medium speed scenarios, absolute forward distance matters less than immediate situational awareness. You need to see sharp turns, low-hanging branches, and off-camber obstacles before the vehicle rotates into them.
The curved profile wins decisively here. The sweeping beam pattern provides immediate illumination of the trail edges. As you approach a switchback, the angled outer diodes light up the apex of the turn. The success criteria for wooded environments prioritize the breadth of light over absolute distance. A wide, smooth wash of light reduces eye strain and prevents the jarring transition between the bright center hotspot and the dark periphery. You spend less time fighting tunnel vision and more time picking the correct line over rocks and roots.
High-Speed Desert & Open Terrain (High Speed)
Desert racing and high-speed open terrain driving demand a completely different optical strategy. When traveling at 60 miles per hour or faster, you cover ground rapidly. Overdriving your headlights—where your stopping distance exceeds your visible range—becomes a critical safety hazard. You must identify washouts, boulders, and terrain changes hundreds of yards ahead.
This is where the straight configuration dominates. The parallel reflector alignment concentrates every available lumen into a piercing forward beam. Success in high-speed environments relies entirely on center lux measurements and maximum forward throw. You do not need to see the sagebrush 50 feet to your left; you need to see the ditch 500 feet dead ahead. The straight profile delivers the focused intensity required for safe high-speed navigation, giving your brain the necessary time to process obstacles and input steering corrections.
Inclement Weather & Dust (Color Temperature Considerations)
Beam spread interacts dramatically with airborne particles like dust, snow, and fog. Wide-spreading curved bars mounted high up on a roofline can cause severe glare in poor weather. The outer diodes illuminate the particles directly in front of the windshield, creating an opaque white wall that blinds the driver. The wider the beam, the more particles it hits near your line of sight.
For these specific conditions, low-mounted lighting is essential. A straight or curved bar mounted low on the front bumper cuts under the driver's sightline. Utilizing amber lenses or lower color temperatures (around 3000K to 4000K) reduces the refractive glare associated with crisp white light. If you frequently drive in heavy dust or fog, prioritize a low-mounted setup over a massive roof array.
Mounting Location
Weather Condition
Beam Profile Recommendation
Visibility Impact
Roof / Upper Windshield
Clear Night
Curved Combo
Excellent panoramic visibility; minimal glare.
Roof / Upper Windshield
Heavy Dust / Snow
None (Turn Off)
Severe backscatter; blinds the driver completely.
Front Bumper / Grille
Fog / Rain
Straight Amber Flood
Cuts under weather; reduces refractive glare.
Lower Bumper / Fog Pocket
Dense Dust
Curved Amber Wide
Illuminates trail edges without hitting sightline dust.
Form Factor & Configuration Options
Single Row Curved LED Light Bar
The physical footprint of your lighting directly impacts vehicle aesthetics and aerodynamics. A single row curved LED light bar features a slim, streamlined profile. This compact design allows for stealth mounting inside factory grilles, below rooflines, or tucked neatly into aftermarket bumpers. It provides a clean, factory-style appearance without dominating the front end of the vehicle.
Aerodynamically, the single row design excels. It significantly reduces wind drag and minimizes the infamous light bar whistle that plagues many roof-mounted setups at highway speeds. The lower surface area cuts through the air more efficiently. This slim form factor comes with limitations. Fewer diodes mean lower total lumen output. While highly efficient, a single row simply cannot match the raw brute force of a larger dual row configuration. You trade absolute brightness for a sleeker, quieter ride.
Curved Dual Row LED Light Bar
For drivers who require absolute maximum illumination, the dual row setup is the standard. A curved dual row LED light bar stacks diodes vertically, effectively doubling the light output within the same horizontal space. This configuration delivers a massive flood and spot combination that turns night into day.
This increased performance requires careful logistical planning. The larger mounting footprint demands heavy-duty brackets to support the increased weight and depth. The dual row housing acts as a larger sail in the wind, increasing aerodynamic drag. The electrical load is substantial. Pushing twice as many LEDs requires higher amperage draw, necessitating robust wiring harnesses, heavy-gauge wire, and potentially taxing stock alternators if run simultaneously with winches or air compressors.
Specification
Single Row Curved
Dual Row Curved
Vertical Profile
1.5 to 2 inches
3 to 4 inches
Weight (50-inch bar)
6 to 8 lbs
12 to 16 lbs
Average Amp Draw (12V)
10 to 15 Amps
20 to 30 Amps
Wind Noise Potential
Low
High (Requires dampeners)
Ideal Mounting Location
Grille, Bumper, Low Roof
Heavy Duty Roof Rack, Custom A-Pillar
Mounting Realities and Vehicle Integration
Roof Line and Windshield Fitment
Modern trucks and SUVs rarely feature perfectly flat surfaces. Windshields possess a natural radius, curving gently from the center to the A-pillars. A curved housing matches this natural geometry seamlessly. When mounted above the windshield, the arced profile tucks tightly against the roofline. This flush fitment looks intentional and integrated, rather than bolted-on as an afterthought.
Beyond aesthetics, this geometric harmony serves a functional purpose. Tucking the housing close to the roofline minimizes wind turbulence. It also helps reduce hood glare. Because the outer edges of the curved bar angle outward and slightly backward, the light clears the edges of the hood more effectively than a straight bar. A straight bar often dumps harsh light directly onto the flat hood surface right in front of the driver, causing severe eye fatigue during long night runs.
Bumper, Grille, and Roof Rack Mounting
Flat mounting surfaces dictate different hardware choices. Traditional flat roof racks, flat steel bumpers, and straight grille openings are structurally designed to accept linear hardware. Evaluating straight bar fitment on these surfaces is straightforward. The brackets align perfectly with the flat plane, ensuring even weight distribution and zero lateral stress on the mounting bolts.
Attempting to force a straight bar onto a curved bumper introduces severe structural stress risks. Using improper spacers to bridge the gap creates leverage points that vibrate loose on corrugated trails. Tightening bolts to force a mismatched bar into place puts immense tension on the aluminum housing. This tension warps the frame, compromises the structural integrity, and leads to premature hardware failure. Always match the geometry of the light to the geometry of the mounting surface.
Aerodynamic Drag and Wind Noise Mitigation
Acoustic comfort inside the cabin is a major consideration for daily-driven off-road vehicles. The acoustic footprint of curved housings generally outperforms straight housings when mounted on the roof. The arced design allows air to flow smoothly around the edges. A flat straight bar acts like an air brake, creating turbulent vortices that manifest as a high-pitched whistle or deep humming noise.
Mitigation strategies are necessary regardless of the profile you choose. To combat wind noise, employ these specific tactics:
Install rubber dampeners between the rear cooling fins to stop harmonic vibrations from traveling through the housing.
Adjust the pitch angle slightly downward to change how the wind strikes the polycarbonate lens.
Utilize aerodynamic snap-on covers when the lights are not in use to smooth the airflow over the diodes.
Ensure all mounting brackets are torqued to spec and use threadlocker to prevent micro-vibrations from loosening the hardware.
Seal any gaps between the mounting bracket and the vehicle body with weatherstripping to prevent air from whistling through tight crevices.
Implementation Risks: What to Check Before Buying
Bracket Compatibility & Housing Tension
Universal brackets rarely work well for curved applications. Avoid generic L-brackets if you are mounting above the windshield. You need vehicle-specific A-pillar or roof mounts designed specifically for the exact radius of your chosen light. Custom brackets ensure the mounting points align perfectly with the threaded inserts on the housing without requiring you to bend or force the metal.
Improper mounting creates lateral tension on a curved housing. If the brackets are too wide and you use the bolts to squeeze them together, you warp the aluminum frame. This warping breaks the delicate silicone weather seals between the polycarbonate lens and the metal body. Once that seal breaks, internal condensation is inevitable. Water droplets will form inside the lens, eventually leading to diode failure and a ruined electrical board.
IP Ratings and Build Quality
Off-road environments subject electronics to extreme moisture, dust, and pressure washing. Understanding Ingress Protection (IP) ratings is non-negotiable. An IP67 rating means the unit is completely dust-tight and can withstand temporary immersion in water up to one meter for 30 minutes. An IP68 rating indicates protection against continuous submersion, while IP69K denotes resistance to high-pressure, high-temperature washdowns.
Curved lenses require significantly more precise manufacturing to maintain waterproof integrity compared to flat lenses. The arced polycarbonate must seat perfectly inside the curved aluminum channel. When evaluating build quality, look for military-style breathers. These small Gore-Tex valves allow the housing to equalize internal pressure as temperatures fluctuate, without drawing in outside moisture. Cheaply manufactured curved bars often lack these breathers and fail at the corners where the sealing tolerances are tightest.
Legal Compliance and On-Road Use
Off-road lighting is strictly regulated on public highways. Department of Transportation (DOT) regulations in most jurisdictions require high-output auxiliary lights to be covered with opaque shields when driving on public roads. An uncovered light bar, even if turned off, can result in a citation in certain states.
Neither curved nor straight off-road bars feature a street-legal cutoff line. Unlike DOT-approved fog lights or headlights, which project a sharp horizontal cutoff to prevent blinding oncoming traffic, off-road bars blast light indiscriminately in all directions. Never use these high-output fixtures on public roads with oncoming traffic. The intense glare will completely blind other drivers, creating a severe accident risk.
Electrical Draw & Relay Requirements
High-output lighting systems pull significant electrical current. You must calculate the total amp draw to ensure your selected relay, fuse, and wire gauge can handle the load safely. The formula is straightforward: Watts divided by Volts equals Amps.
For example, a 300-watt dual-row bar running on a standard 12-volt system will draw 25 amps (300 / 12 = 25). This requires, at minimum, a 30-amp relay and 12 AWG wiring. Undersized wiring will overheat, melt the insulation, and potentially cause an electrical fire. Always verify that your vehicle's alternator can support the additional continuous load. If you run a winch, a fridge, and massive lighting simultaneously, you may need to upgrade the Big Three wiring or install a high-output alternator.
Total Amp Draw
Recommended Wire Gauge (Up to 10 feet)
Recommended Wire Gauge (10 to 20 feet)
Minimum Relay Size
0 - 10 Amps
16 AWG
14 AWG
20 Amp
11 - 20 Amps
14 AWG
12 AWG
30 Amp
21 - 30 Amps
12 AWG
10 AWG
40 Amp
31 - 40 Amps
10 AWG
8 AWG
50 Amp
Conclusion
Measure your exact intended mounting width and verify the radius of your mounting surface to ensure bracket compatibility before ordering.
Calculate the total amperage draw of your chosen light to confirm your vehicle's electrical system and wiring harness can safely support the continuous load.
Source vehicle-specific mounting brackets to prevent lateral housing tension and protect the silicone weather seals from premature failure.
Verify the IP rating of the specific model meets IP67 or IP68 standards to survive your expected regional weather conditions.
Install rubber vibration dampeners and torque all mounting hardware to spec to eliminate wind noise and harmonic resonance at highway speeds.
FAQ
Q: Does a curved LED light bar shine further than a straight one?
A: No, straight bars typically have a longer forward throw due to concentrated, parallel reflectors. Curved bars sacrifice some forward distance to create a wider peripheral spread, making them better for cornering but slightly less effective for extreme long-distance visibility.
Q: Can I mount a curved light bar on a flat roof rack?
A: Yes, but it requires specialized offset brackets. It may look aesthetically awkward, leave gaps that create wind noise, and potentially stress the housing if forced into place without proper alignment hardware.
Q: What is the difference between a single row curved LED light bar and a dual row?
A: Single rows have one line of LEDs, offering a slimmer, more aerodynamic profile that fits into tight spaces. Dual rows stack two lines of LEDs for significantly higher light output but require more mounting space and draw more electrical power.
Q: Do curved light bars create more wind noise than straight bars?
A: Generally, curved bars create less wind noise when mounted above the windshield. Because they match the aerodynamic flow and natural radius of the vehicle's roofline better than a flat, straight bar, they reduce turbulent air drag.
Q: Which beam pattern is best for foggy or dusty conditions?
A: Neither is ideal for fog if mounted high on the roof, as both will reflect glare back at the driver. For dust or fog, an amber-lensed straight or curved bar mounted as low as possible on the front bumper is the safest choice.
Q: Are curved LED light bars more expensive than straight ones?
A: Yes, typically. The manufacturing process for extruding curved aluminum housings, molding custom-arced polycarbonate lenses, and engineering precise weather seals is more complex, resulting in a slight price premium over straight models.
Shenzhen Creek Optoelectronic Technologies Co., Ltd. produce Car LED work lights, off-road LED light bar, forklift safety lights, agricultural tractor work lights, LED strobe and beacon lights, car radios, etc.